Home
Woodworking
Hand Railings
Skirt Boards
Crown Molding
Bidding
Wainscoting
Chair Rail
Interior Doors
Closet Doors
Exterior Doors
Installing Doors
Baseboard
Installing Baseboard
Windows
Install Cabinets
Hand Tools
Power Tools
Blog
Contact
Link Partners
Tool Reviews
About Me
Can't Find Something?
Check The Sitemap
Site Map
Woodworking
Hand Railings
Skirt Boards
Crown Molding
Bidding
Wainscoting
Chair Rail
Interior Doors
Closet Doors
Exterior Doors
Installing Doors
Baseboard
Installing Baseboard
Windows
Install Cabinets
Hand Tools
Power Tools
Blog
Contact
Link Partners
Tool Reviews
About Me
Check The Sitemap
Site Map
[?] Subscribe To This Site
Easy to Install Crown Molding
An easy method for installing crown moulding

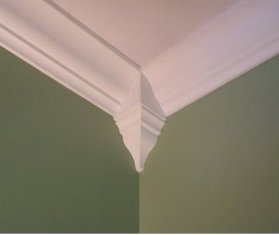
Crown Molding Corner Inside Block
Using easy to install crown molding allows anyone to give any room a new look in one day. The cost of installing crown moulding will be less than wallpapering and in some cases less than re-painting the entire room. Crown molding is available in lightweight materials that allow everyone to install it easily and quickly.
Getting Started
Choosing the right type of crown molding to install is important. Easy-to-install crown moulding comes in a variety of widths and styles. If a room is small, consider choosing a thin, two or three-inch crown molding, as it tends to make rooms appear smaller.
Installing a very wide type of moulding in a small room may appear to reduce the size of the room even more. Ornately carved wide moulding may look wonderful in a living room but it may be a bit much for a laundry room. Consider the size and type of room when choosing crown molding.
Measurements
Crown molding can be purchased in many widths and most pieces are eight feet in length.
Corner sections and pilasters allow for less work when installing crown moulding.
Pilasters are carved sections placed where two pieces of molding meet or at regular intervals along the length of the wall.
Measure the length of each wall. Add the four numbers together for the total length needed. If you plan on using pre-fabricated corner pieces and or pilasters be sure to account for them in the total length measurement. It is a good idea to have a few more feet of molding than is required just in case.
Professionals suggest that purchasing 10% more modeling than the length required is an appropriate extra amount. A bad cut can be easily fixed if an extra foot or two of molding is available.
Tools
There are very few tools required when using easy to install crown molding.
A stepladder so that the ceiling and wall joists can be reached,
a wood saw or miter saw
sandpaper
caulk gun
And type of caulk adhesive is all that is needed
Each type of decorative crown molding will use a specific type of adhesive. Be sure to check the manufacturers recommended type of adhesive when purchasing crown-molding strips individually. Crown molding kits come with the correct adhesive for the type of molding purchased.
Installation
There is no wall or ceiling preparation required when using easy to install crown molding. Painting the walls before installation is recommended.
Finishing the crown molding by painting or staining is also recommended.
Painting the room before installing the crown molding allows a more professional finish to the room.
Crown molding that is stained or painted prior to installation will eliminate the need to touch up ceiling or wall surfaces.
If you are using pre-fabricated corner pieces, it is recommended that you install these first. Putting the corner sections up first allows for precise cutting of the long sections of the crown molding.
Once the length of crown molding has been checked for fit, apply the recommended adhesive and press into place. Most adhesives will dry completely in a few hours. Unlike older types of adhesives, modern adhesives are odor free and are made with environmentally safe materials.
Transforming a room using easy to install crown molding is a great way to remodel any room. Once you have completed one room, finding other rooms that would benefit from the addition of crown molding will not be difficult.
Return From Easy to Install Crown Molding Page Back to Installing Crown Molding Page.
Return From Easy to Install Crown Molding to Home - finishcarpentryhelp.


